Tech, Linux, servers
I never seem to post anything about all the science news I read about, and the list of science podcasts I listen to daily. There are some great stories and resources I've spent years collecting - I really ought to share them.
A collection of software scripts, etc. mostly designed to be useful on Ubuntu GNU Linux systems.
Red Hat Certified Engineer (RHCE) course
This is for notes during my study to become a Red Hat Certified Engineer (RHCE).
I'm going through the Red Hat Certified Systems Administrator (RHCSA) material first, but it's rather disappointingly not much of a learning experience. I suppose that could be seen as a good thing, as it means I know a fair bit more then I expected. Or, it means a RHCSA certificate isn't as valuable as I initially thought...
Some simple things learned:
-
cd -
- change directory back to prior one
That's handy! But I hardly expected "How to use ls and cd and mkdir and rm" as part of a certification program. Just too basic.
Here's another one:
changes to anotherUserName's home folder. I'd normally have done
Handy yes, but I'm rather tired of going through pages of docs for such tiny nuggets of new material.
Also - LDAP (Lightweight Directory Access Protocol) client configuration is on the curriculum. Unfortunately, the material only touches on setting up as a client; I need to know how to set up a server to a) ensure the client is properly and completely understood, and b) "because it's there". i.e. it's an extremely useful tool, hence I want to know both sides of the client / server setup.
Virtual Machines: KVM / qemu / libvirtd
Managed to b0rk my Win7 test platform whilst trying to have it recognize a crappy TV tuner card that's Windows only.
Error message received wasn't exactly explicit:
error: Failed to start domain Win7
error: Unable to read from monitor: Connection reset by peer
Er, thanks, I guess.
Bit of sleuthing showed that I needed to check the error log (duh):
Which showed the error:
LC_ALL=C PATH=/sbin:/usr/sbin:/bin:/usr/bin QEMU_AUDIO_DRV=none /usr/libexec/qemu-kvm -name Win7 -S -M rhel6.5.0 -enable-kvm -m 2048 -realtime mlock=off -smp 4,sockets=4,cores=1,threads=1 -uuid c8652cca-0437-901c-4b59-b9d3fdc84cd6 -nodefconfig -nodefaults -chardev socket,id=charmonitor,path=/var/lib/libvirt/qemu/Win7.monitor,server,nowait -mon chardev=charmonitor,id=monitor,mode=control -rtc base=localtime,driftfix=slew -no-shutdown -device piix3-usb-uhci,id=usb,bus=pci.0,addr=0x1.0x2 -drive file=/var/lib/libvirt/images/Win7.img,if=none,id=drive-ide0-0-0,format=raw,cache=none -device ide-drive,bus=ide.0,unit=0,drive=drive-ide0-0-0,id=ide0-0-0,bootindex=1 -drive file=/media/[snip]/Windows/ISOs/Win7.iso,if=none,media=cdrom,id=drive-ide0-1-0,readonly=on,format=raw -device ide-drive,bus=ide.1,unit=0,drive=drive-ide0-1-0,id=ide0-1-0 -netdev tap,fd=25,id=hostnet0 -device rtl8139,netdev=hostnet0,id=net0,mac=52:54:00:a9:c1:c7,bus=pci.0,addr=0x3 -chardev pty,id=charserial0 -device isa-serial,chardev=charserial0,id=serial0 -device usb-tablet,id=input0 -vnc 127.0.0.1:0 -vga std -device AC97,id=sound0,bus=pci.0,addr=0x6 -device pci-assign,host=06:00.0,id=hostdev0,configfd=26,bus=pci.0,addr=0x5 -device virtio-balloon-pci,id=balloon0,bus=pci.0,addr=0x4
char device redirected to /dev/pts/5
Failed to assign device "hostdev0" : Operation not permitted
qemu-kvm: -device pci-assign,host=06:00.0,id=hostdev0,configfd=26,bus=pci.0,addr=0x5: Device 'pci-assign' could not be initialized
2014-06-12 06:06:27.011+0000: shutting down
So, merely had to issue the following command:
Domain Win7 XML configuration edited.
and removed this:
<source>
<address domain='0x0000' bus='0x06' slot='0x00' function='0x0'/>
</source>
<address type='pci' domain='0x0000' bus='0x00' slot='0x05' function='0x0'/>
</hostdev>
Re-start the Virtual Machine:
Domain Win7 started
Fixed!
Fail2Ban: Jails, filters, and time tricks
Fail2Ban is a brilliant piece of IDS (Intrusion Detection Software) that I've got a crush on.
I've developed a couple "jails" -- rules for banning IP addresses.
First, a couple thoughts, tricks, and tips:
- First, maxretry should probably be called maxattempts, as I don't want any retries on logging in as root via ssh.
-
A handy way of dealing with findtime and bantime is to create these aliases:
## bantime of 3600 = 60*60 = one hour
## bantime of 86400 = 60*60*24 = one day
## bantime of 604800 = 60*60*24*7 = one week
## bantime of 2592000 = 60*60*24*30 = (approx) one month
## bantime of 31536000 = 60*60*24*365 = (approx) one year
one_hour = 3600
one_day = 86400
one_week = 604800
one_month = 2592000
one_year = 31536000Then refer to them like this:
findtime = %(one_week)s
bantime = %(one_week)sNOTE the %(...)s do NOT forget trailing "s"!
-
Actions can be chained. I wanted to both ban users and email myself, so I did this:
action = iptables-multiport[name=apache-phpmyadmin,
port="http,https", protocol=tcp] %(action_mwl)sNOTE the %(...)s do NOT forget trailing "s"!
I've had emails saying Fail2ban had banned an IP, but testing showed it didn't. WTF?!? This is important that this works!
When you run a new jail, or start one, also run:
sudo iptables -n --listand watch for a "chain" for each of your jails, and, make sure each chain has a reference, like this:
target prot opt source destination
RETURN all -- 0.0.0.0/0 0.0.0.0/0
If there are 0 (zero) references, then reload the chain's jail like this:
(substituting name of your jail with no references).
What happens is, sometimes the INPUT chain doesn't refer any packets to the fail2ban chain(s), so you'll get an email saying a ban has happened, but it hasn't taken effect, and leaves cryptic messages in /var/log/fail2ban.log.
Good luck with your fail2ban installation!
| Attachment | Size |
|---|---|
| 1.96 KB | |
| 665 bytes |
MySQL slave on CentOS
Got a CentOS box running as a slave of my Ubuntu server.
Here are the steps I took, starting on the slave:
# yum install mysql-server*Then we ought to secure our installation:
# /usr/bin/mysql_secure_installationOn the master, we need to create a user for the slave to connect as (adjust user name & IP address to suit your needs):
mysql> GRANT REPLICATION SLAVE ON *.* TO 'slave'@'192.168.1.%' IDENTIFIED BY PASSWORD [your-choice-of-password]Now, as extra precaution, lock all tables for reading only (our mysqldump will --lock-all-tables too):
mysql> FLUSH TABLES WITH READ LOCK;That will lock out writing to the tables (all tables, all databases) until while we get a dump of the data. Do not close this mysql session else the locks will be released. When running mysqldump with the "--master-data", it will set "--lock-all-tables" there too, so this might be a bit redundant.
I like to dump the databases individually, so I use a script for that, but here is how to simply dump all of them (run in a Bash shell):
$ mysqldump --create-options --master-data=1 --hex-blob --tz-utc --add-drop-database --disable-keys --flush-logs --add-locks --no-autocommit --all-databases > load-on-slave.sqlNow we can release the lock on the master:
mysql> unlock tables ;On the slave, we need to get our dumped data:
ftp [master host]

ftp> bin

ftp> prompt

ftp> mget load-on-slave.sql

ftp> quit
We also need the slave's /etc/my.cnf configuration file set to slave mode:
/etc/my.cnf:
	master-user = [slave's user name]

	master-password = [slave's password]

	master-port = 3306
Nearing completion, start mysqld on slave, then issue a CHANGE-MASTER-TO statement setting the master_host (adjust to your needs), master_user (the user created on master, above), and master_password:
mysql> CHANGE MASTER TO master_host='192.168.1.##', master_user='slave', master_password='[password]';Finally, load the data into the slave and start the slave, password option omitted in this example; you might need it:
In Bash:
$ mysql --user=[you] Now, initiate the slave process:
myql> start slave;See if things appear to be working:
mysql> show slave status \GYou can now create a database on the master "CREATE DATABASE ZZZ;", then "SHOW DATABASES;" on the slave to see if it appears in the list. A "DROP DATABASE ZZZ;" should make the ZZZ database disappear from the master and the slave.
Further details on master-slave replication on version 5.1 is available on MySQL's web site (or, for version 5.5 here.)
Tags:
XFCE remote desktop server
Mom's Ubuntu 10.04 went wonky (desktop came up, no response to user input via mouse or keyboard), likely due to a software update. Unfortunately, it was days between applying the update(s) and a reboot, and I'd forgotten what was updated.
I was quite hesitant to upgrade her to 12.04 or 14.04 since
a) I'm at least 4,000 km away if something goes wrong, and
b) Unity == no thank you (the new Ubuntu desktop is called Unity)
As I considered my options and poked around her computer via SSH, I came up with an idea, to give her a brand new desktop environment:
This got her a desktop which actually responded to user input, yay.
Unfortunately she found it jarringly different (and if she saw Unity?!?) and wasn't very comfortable navigating the menu.
I launched Thunderbird via SSH so she could at least access email while I investigated how to get remote desktop server (VNC server) running.
I kept finding pages discussing vino-server, which is a gnome tool. I could run it, but when trying to connect, I couldn't authenticate.
Finally, thanks to user "twb" on Freenode's #xfce channel, the answer was provided.
man x11vnc
x11vnc -display :0
And, I'm in.
So now I'm learning XFCE desktop environment and I expect Mom will get a
on her Lucid 10.04 in short order. Xubuntu 14.04, here we come.
Samba over OpenVPN
Had a lot of difficulties binding my Samba server to OpenVPN's TUN0 with the settings "interfaces = 10.0.0.0/24 tun0" and "bind interfaces only = yes".
It refused to work: no one could connect on any interface.
So, I removed "interfaces" and "bind interfaces only" from smb.conf and I used my firewall to block Windows share ports (135, 137, 138, 139, 445) on eth0. However, when I got Fail2Ban going, I discarded some of the old firewall rules. Not a problem.
Until...
In my new dual router home config, I accidentally left my server in a DMZ (DeMilitarized Zone: open access). Lots of attempts on my Samba server, trying to access my Windows shares. So far I haven't found any successful attempts, but must do more auditing.
This is unacceptable, so I found another configuration parameter that helps solve the issue without having to have iptables firewall rules:
In smb.conf, add these lines:
hosts deny = 0.0.0.0/0
Solved it for me. Whew.
WiFi Access Point in Linux (part 1)
I found a WiFi card in an old HP box. Someone gave me an antenna for it - I wanted to turn it into an alternate WiFi access point as my WiFi router requires regular reboots as our mobile devices regularly fail to connect.
As it's getting quite late, I thought I'd better make a quick note on what I had to do to enable hostapd to work.
It was failing to go into Master mode - would only accept Monitor or Ad-Hoc modes.
Turns out, needed to turn off hardware encryption on the driver.
modprobe rt73usb nohwcrypt=Y
service hostapd start
And, success. Note that iwconfig wlan0 mode Master also failed.
To make it permanent: in your favourite editor, create file called /etc/modprobe.d/rt73usb.conf and add this:
inside.
To check the possible options on a kernel driver, for example the rt73usb being discussed here:
Here's the final, crucial line of output from the above command:
Must now get DHCPD.conf set up (for virbr0 and vnet0 - for KVM not for WiFi), and proper packet forwarding as my phone's connecting but not getting traffic through.
A couple of things suggested:
iptables -t nat -I POSTROUTING 1 -o eth0 -j MASQUERADE
Note that I inserted -I an entry into the POSTROUTING table, instead of the recommended -A append. This is more important with the FORWARD chain, as CentOS has a nice, secure default final rule of REJECT ALL.
The IP forwarding was already set up, and the iptables thing didn't work for me.
See where I revisit this issue at part 2.
Will investigate what I did wrong in the morning.
SOLVED: See solution in this comment.
WiFi hotspot with hostapd (part 2)
This post is dealing with the issues that have arisen from trying to turn my PC into a WiFi hotspot using hostapd in CentOS 6.5.
I have neglected this site so badly that I'd completely forgotten part 1, it is worth checking out.
I have a D-Link WiFi router (WBR-2310) that loses its ability to serve up WiFi connections to various mobile devices, requiring semi-frequent reboots of the router. This takes the network down for 30-35 seconds - a huge and unbearable burden.
The fix (number one) was to use an ancient LinkSys non-WiFi router as the household router and the D-Link as a WiFi Access Point.
Then I scavenged a USB WiFi card, which I mounted into my main tower.
This is to become a secondary WiFi access point.
hostapd to the rescue. Initially, I got a working setup, but that was prior to bringing the LinkSys into the equation. Now that I have two routers, I decided to revisit the hostapd backup solution.
Initially I'm aiming for an open (non-password-protected) AP, and the details of how to set up hostapd.conf are covered many other places elsewhere.
This has proven more difficult than anticipated, particularly since simply bringing up wlan0 and starting the hostapd service failed with unloaded driver error.
First of all, some details on the card:
Bus 003 Device 002: ID 15a9:0004 Gemtek WUBR-177G [Ralink RT2571W]
As we can see, the card self-identifies as an Ralink RT2571W. However, the kernel drivers needed for it are not rt2500usb, nor rt2x00usb, nor what the kernel somehow auto-loaded, rndis_wlan.
Instead, one needs to load the rt73usb driver, and in my case, also unload the rndis_wlan:
modprobe -ir rndis_wlan
Then, I want to make a persistent wlan0 interface that is active upon boot, so I made a file /etc/sysconfig/network-scripts/ifcfg-wlan0, and added these to it:
ESSID=w00fi
DEVICE=wlan0
# HWADDR refers to physical, MACADDR is for reassigning (don't use both)
HWADDR=00:C0:A8:F0:E8:AB
IPADDR=192.168.1.169
NETMASK=255.255.255.0
NETWORK=192.168.1.0
GATEWAY=192.168.1.1
ONBOOT=yes
MODE=AP
TYPE=Wireless
BOOTPROTO=none
IPV4_FAILURE_FATAL=yes
IPV6INIT=no
# KEY_MGMT=WPA-PSK
# WPA_ALLOW_WPA=yes
# CIPHER_PAIRWISE=NONE
# CIPHER_GROUP=TKIP
PEERDNS=no
I run a DHCP server on the PC - you'll need something that will have the same functionality.
Now, one ought to be able to obtain an IP address on a WiFi enabled mobile device (at least if DHCPD is running on the main PC).
But in order to, say, ping that device, a routing table entry must be made to tell the PC how to find the mobile. In my case, the mobile is 192.168.1.96 and the WiFi card is wlan0:
Presto - the running ping from mobile to PC that was failing is now successful.
Now, a couple of iptables rules need to be applied, and this is where I'm having problems. I understand basic iptables rules just fine, but the ones I have just don't seem to be working.
I'll save my post for now and add more when I've dug into why the final steps are failing.
SOLVED: See solution added in comment
Georgia Straight uses Drupal - poorly
I have a guilty pleasure - I read the Georgia Straight's "Confessions".
I've often puzzled over how the confessors refuse to use paragraph breaks.
Finally, I posted to a particularly lengthy (longer than one screen) paragraph confession:
tl;dr
Mar 8, 2014 at 4:13 am
I'm very curious if the Georgia Straight is eating carriage returns / line feeds or if confessors tend to never ever use them?Anyone know - it's frankly kind of annoying, and I suspect it's the GS's fault.
Which currently sits at +1 -7 = -6 in the thumbs rating.
Someone confirmed my suspicions:
Tl;dr - I think you are right because GS took out my paragraph breaks on a previous post. I find it annoying as well!
To which Martin Dunphey (staff member) replied:
Martin Dunphy
Mar 8, 2014 at 2:07 pm
Re: Cookie and tl;dr:The Straight doesn't touch paragraph breaks.
Sounds like a technical glitch on your end.
No, Martin, sorry but it's you, not me:
Hi Martin,
I see para breaks in your post, so my end is working just fine.
Another poster above has confirmed that the GS eats consecutive "enter" key presses (para breaks) in Confessions (not comments).
TL;DR version: it's you, not me.
Your Drupal installation has an unfortunate choice of Text Format on the Confessions input text area that is different than is on the *comments*.
Among the choices are Filtered HTML and Plain Text. Set to Plain Text to honour paragraphs; HTML reduces consecutive white space to a single one.
Thanks!
Let's see if the issue finally gets corrected.
Nikon video playback problem
Mom's new Nikon Coolpix S9100 takes HD video.
Once she got a card reader (her Linux PC didn't mount the camera due to a PTP vs MTP issue (I believe the issue is that Ubuntu 10.04 doesn't support MTP: I'm 5,000km away, cannot thoroughly test it)), she loaded her images & videos onto her hard drive.
But the video playback was jerky, played for a few seconds, paused (audio continued), pixelated some frames, paused, then played the final few frames.
This was using VLC or Movie Player in Ubuntu, and with Media Player Classic (a slightly old version), or Media Player 11 in Windows XP.
Seems others have encountered this issue too.
Here (finally) is my solution:
Transcode the videos with FFmpeg.
It seems the problem stems from the video "container" claiming to be 59.94 frames per second, while the video itself is 29.97 frames per second.
To find out what FFmpeg reported this about the input video & audio streams, I typed this command:
ffmpeg -i DSCN0045.MOVand here are the results:
Input #0, mov,mp4,m4a,3gp,3g2,mj2, from 'DSCN0045.MOV':
Duration: 00:01:13.07, start: 0.000000, bitrate: 14613 kb/s
Stream #0.0(eng): Video: h264, yuv420p, 1920x1080, 29.97 tbr, 29.97 tbn, 59.94 tbc
Stream #0.1(eng): Audio: aac, 48000 Hz, stereo, s16
So, to fix it, transcode the movie from h264 video to mpeg4, and the audio from AAC to either alac (Apple Lossless Audio Codec) or ac3 (Dolby).
Try this:
ffmpeg -metadata author="Betty" -metadata title="Isaac in puddle" -metadata year="2011" -metadata comment="Mom's new camera, at Cory's" -metadata duration="00:01:13.07" -i DSCN0045.MOV -b 14613kb -r 29.97 -acodec ac3 -ab 128kb -vcodec mpeg4 DSCN0045.MOV.aviHere's what's going on in that command:
-metadata is optional, but allows some data to be stored inside the output file, viewable by right-clicking and selecting Properties. Duration is reported by FFmpeg, see first quote block above.
-i DSCN0045.MOV is input filename.
-b 14795 is video bitrate. This should be copied from the FFmpeg output, quoted above.
-r 29.97 is the frame rate (frames per second), also copied from FFmeg output above. Note that it can be different from file to file.
-acodec ac3 is the audio codec to use. -acodec alac is also acceptable.
-ab 128kb is the audio bitrate, as reported by FFmpeg. Be sure to re-use the input file's audio bitrate!
-vcodec mpeg4 is the output video codec, reported by FFmpeg. Be sure to use the input file's video bitrate!
Finally, give an output file; I chose *.avi but *.mov or *.mp4 should work. AVI gave me instant thumbnails in the file browser, so that's my only reason for choosing it.
Now your output file is viewable with anything you choose, with audio and video quality indistinguishable from the original.
DDoS on SpamHaus via DNS Amplification
There's bee a lot of talk about the DDoS (Distributed Denial of Service) attack on Spamhaus recently, putatively launched by Cyberbunker or their clients.
I've read over and over again how open DNS resolvers are responsible and Sysadmins running DNS servers ought to deny recursive look-ups to requests from outside their own network.
Or rate-limit requests. Or even test for spoofed source addresses (how that would be possible for the DNS server is left as an exercise in head-scratching for those who understand the word "spoof").
I tend to run open DNS servers, but my theory is that ISPs should be blocking packets leaving their networks that have source IPs that appear to be outside their networks (egress filtering).
Apparently I'm not alone, just in the minority of sysadmins that hold that view point.
The IETF (Internet Engineering Task Force) has Best Current Practices guide about this. Before I quote from it, I'll note that they call it "ingress" filtering, as they apply the filtering to ISPs' routers that exist between ISP & client, as opposed to a filter at the outside edge of the ISP where it uplinks to a backbone connection.
Below can be found at the summary of the Best Current Practice (dated May 2000):
Ingress traffic filtering at the periphery of Internet connected networks will reduce the effectiveness of source address spoofing denial of service attacks. Network service providers and administrators have already begun implementing this type of filtering on periphery routers, and it is recommended that all service providers do so as soon as possible. In addition to aiding the Internet community as a whole to defeat this attack method, it can also assist service providers in locating the source of the attack if service providers can categorically demonstrate that their network already has ingress filtering in place on customer links.
Added bonus:
Corporate network administrators should implement filtering to ensure their corporate networks are not the source of such problems. Indeed, filtering could be used within an organization to ensure users do not cause problems by improperly attaching systems to the wrong networks.
It seems that while "network administrators have already begun implementing" filtering, it's far from being effectively implemented.
I hope to end up in a NOC for a large ISP some day, and I intend to implement such filtering at each step along the way. IPtables to the rescue!
I should add, if you do wish to configure your DNS to limit recursion, CYMRU has a guide on how to do it.
Short answer:
options {
recursion no;
additional-from-cache no;
};
They then outline how to set up an ACL for your trusted clients.
From "man named.conf", one can also control recursion with this:
allow-recursion-on { address_match_element; ... };
Tags:
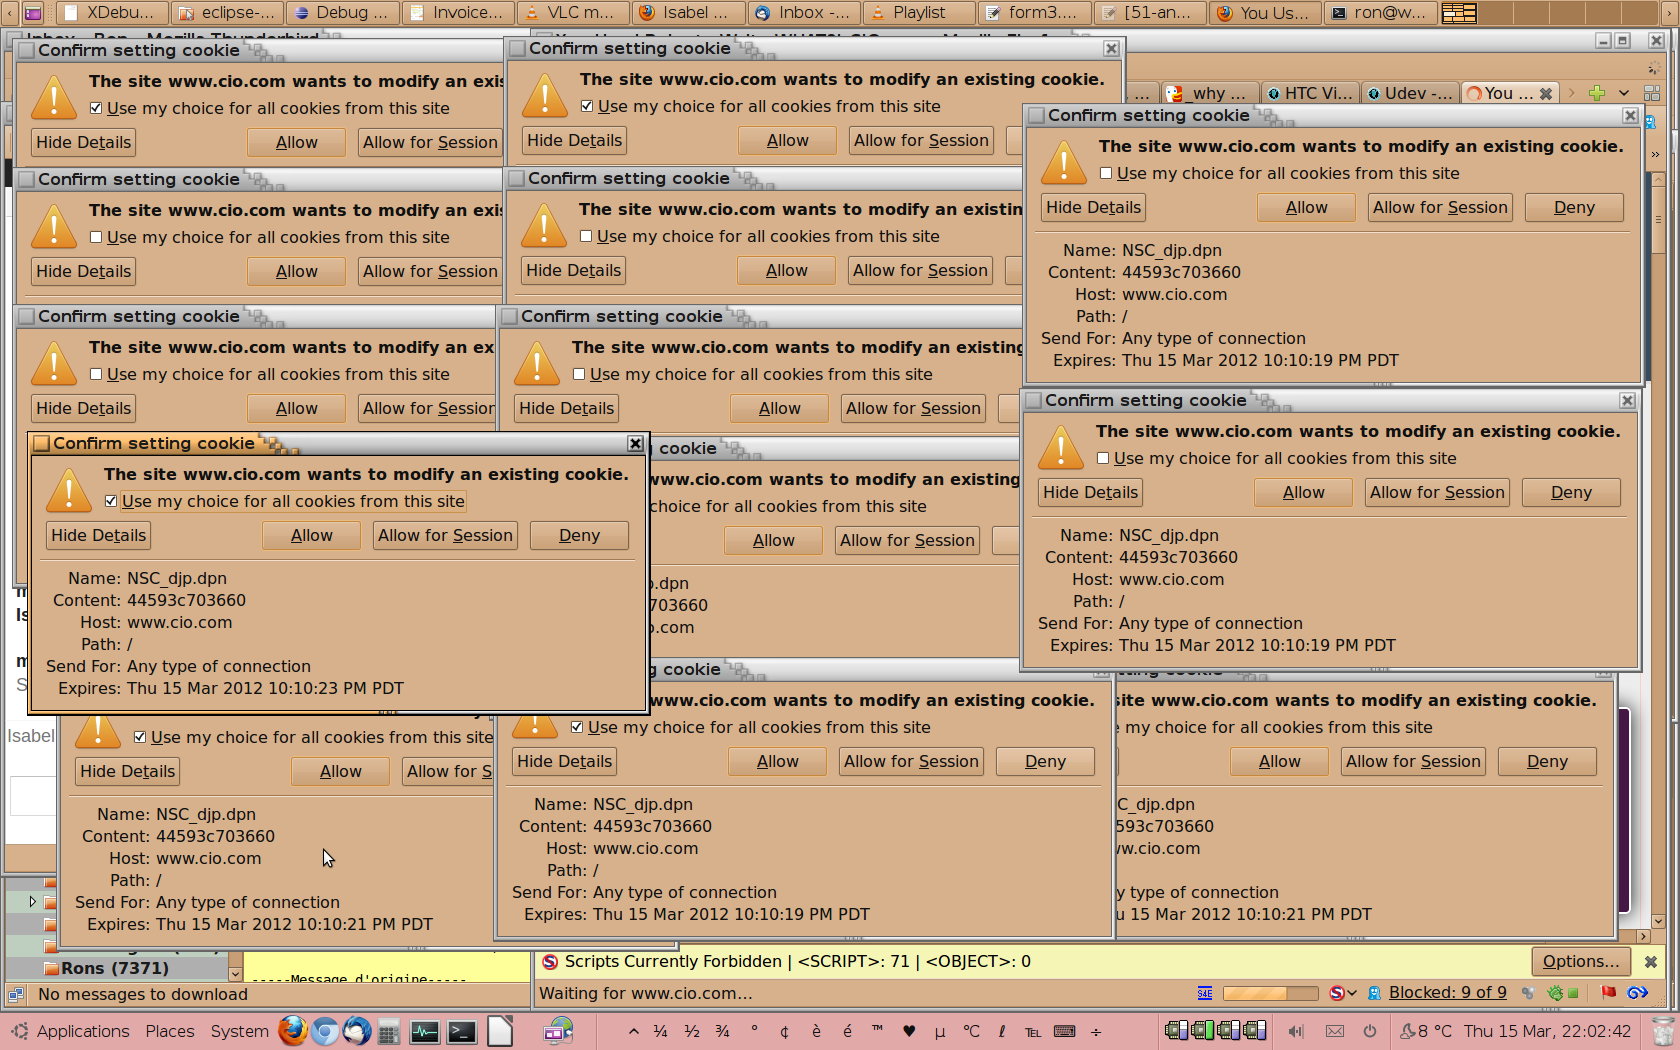
Cookie Monster: what is CIO.com THINKING?
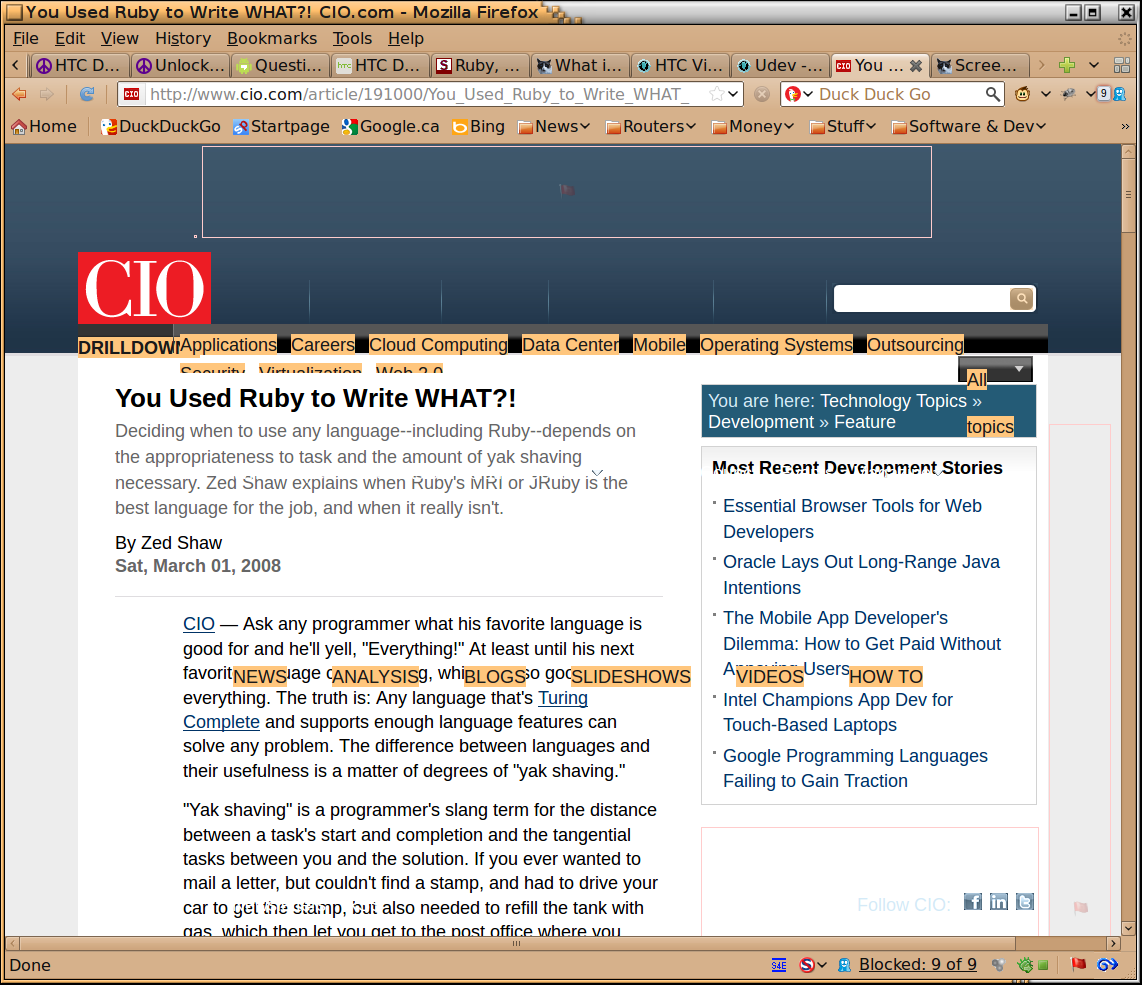
Saw a link to a CIO.com story entitiled, "You Used Ruby to Write WHAT?!". It could've been entitled, "How NOT to use cookies."
I have Firefox set to ask my permission when a site tries to set a cookie. CIO.com throws so many attempts before I can confirm / deny the request (it is a request to store info on my computer, you CIO-tards) that, after clearing a bunch of requests, I had this on my screen:

Remember, I had already cleared maybe a dozen pop-ups and another dozen or so are hidden beneath others in the screenshot above.
And interesting aside, when trying to swipe the title text, "You Used Ruby to Write WHAT?!" from their site, I got 6 characters highlighted before other elements above, beside, and below started to become highlighted. I had to complete the highlighting with shift-right-arrow.
Here's what it looked like after my mouse passed the "S" in "You Used" in their page's title:

Hey, CIO.com, you used WHAT to write that piece of shit?!?
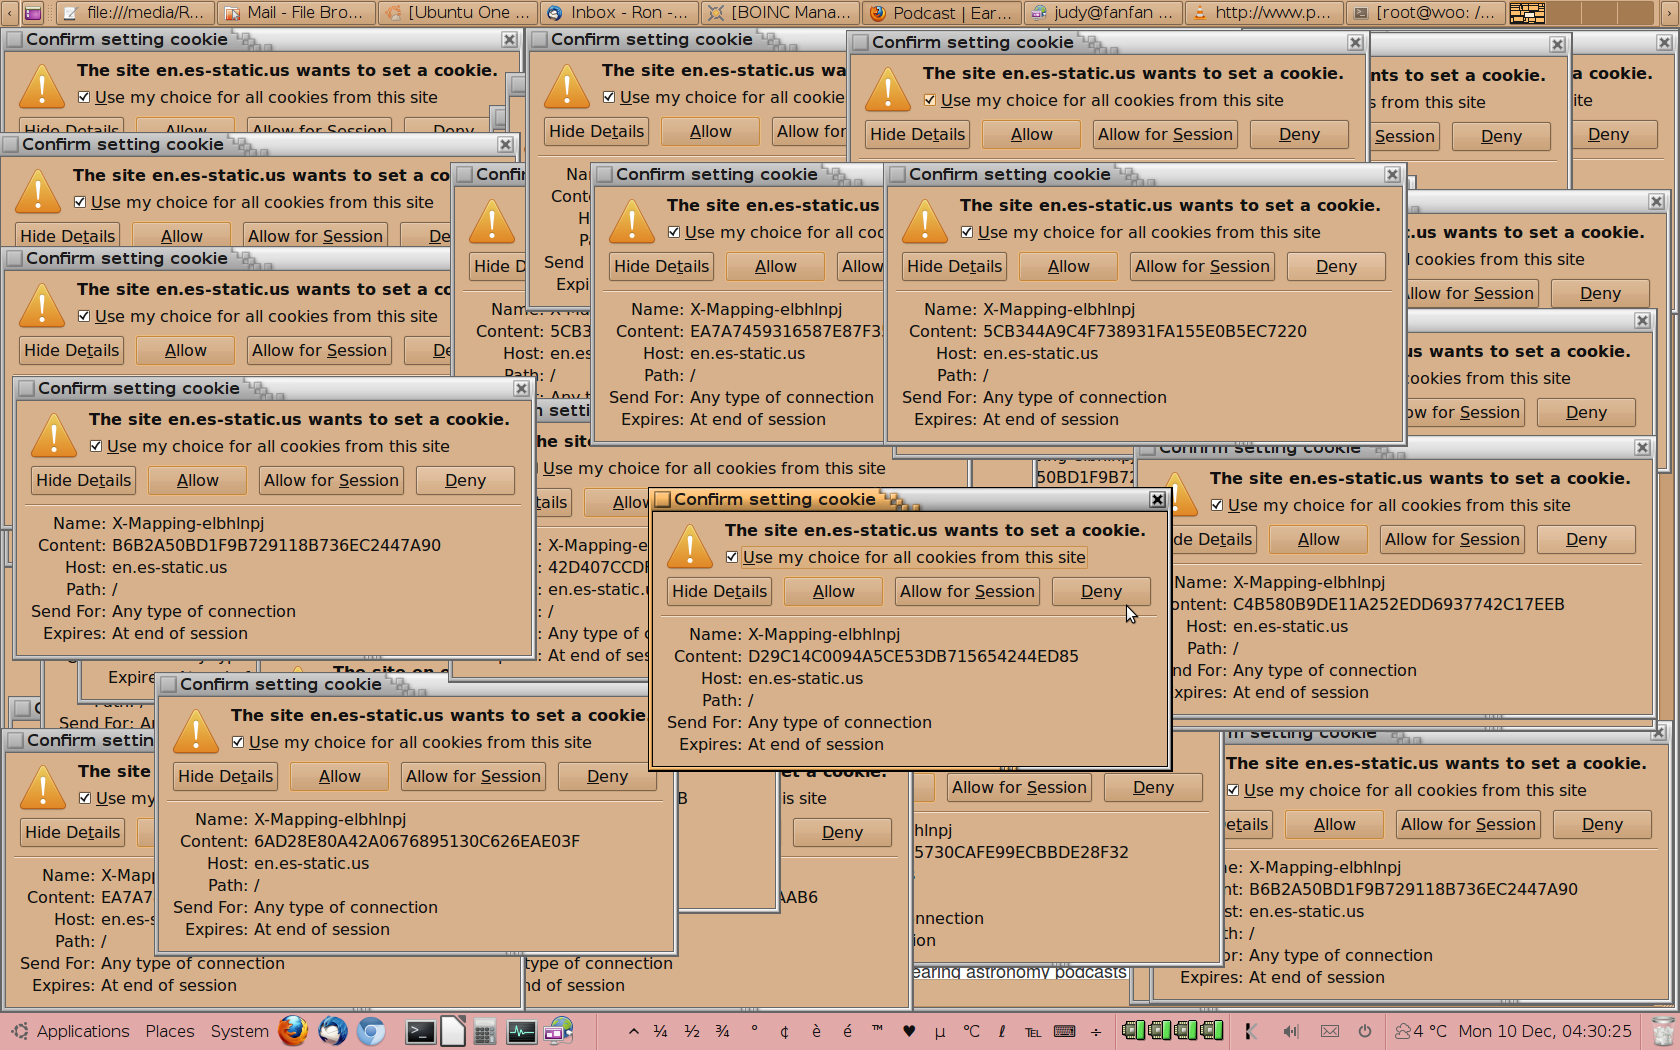
Oh, look here, another site like that, "es-static.com":

| Attachment | Size |
|---|---|
| 344.24 KB | |
| 223.49 KB | |
| 393.59 KB |
Tags:
EasyGestures
EasyGestures is one of my favourite Firefox extensions.
It allows one to middle-click on a web page, bringing up a "pie" menu: a ring of small icons around the click point.
However, with Firefox's rapid release cycle, EasyGestures hasn't officially worked since FF version 4, which was only the current version for 3 nanoseconds.
I've downloaded the most-current version of EasyGestures, updated the maxVersion to 9.*, and posted it below.
Please note, I did not write this magnificent software, Ons Besbes did. And kudos to him/her!
Here's a screenshot (with borders) of an EasyGestures pie menu:

| Attachment | Size |
|---|---|
| 471.52 KB |
Login error: Could not update .ICEauthority file
Encountering the following error message when logging in to Ubuntu (or another Linux)?

Could not update ICEauthority file /home/user-name/.ICEauthority
I had that on my Mom's machine, and it drove us nuts. I tried every trick I could find on the Internet and a bunch more of my own.
Finally found the solution, and it was embarrassingly simple... No auto-login is allowed if you have an encrypted home folder. Makes sense, but if you forget it's encrypted and want a quicker login, you're in for trouble.
There were 3 error messages that popped up; here are the second and third ones:
Number 2:
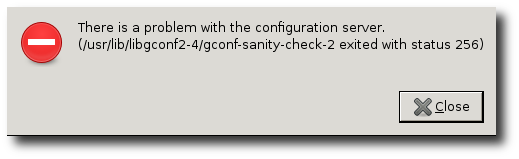
")
There is a problem with the configuration server.
(/usr/lib/libgconf2-4/gconf-sanity-check-2 exited with status 256)
Number 3:

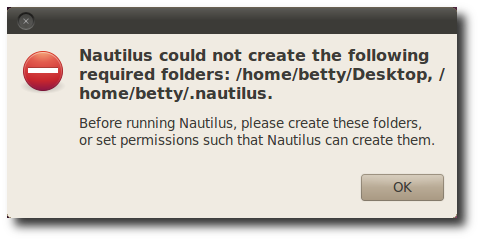
Nautilus could not create the following required folders: /home/user-name/Desktop, /home/user-name/.nautilus
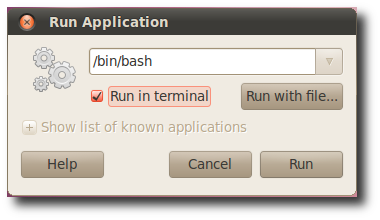
The solution was to click through these errors. Then, as no desktop comes up, press Alt+F2 (that's the Alt key and the top-row's F2 key at the same time). This will bring up a dialogue box asking what programme you'd like to run:

Alt+F2 to Run Application, type /bin/bash.
Now you should have a terminal window running. Restart the Gnome Display Manager (desktop, etc.) by typing:
sudo /etc/init.d/gdm restart and give your password when prompted. You should have a desktop afterward.
This is the embarrassing part: I'd forgotten that I had changed user settings to login without password prompt. Fix that by clicking System -> Administration -> Users and Groups.
Unselect the "Don't ask for password on login." option.

Don't ask for password on login.
If you have also edited a file on your system to automatically log you in, and you have an encrypted home directory, you need to edit the file you probably edited to cause all this:
sudo nano /etc/gdm/custom.conf - enter your password when prompted.
Make sure neither of the following settings are "true":
TimedLoginEnable=false
AutomaticLoginEnable=false
If you had to change anything, press CTRL+O to save (write Out) the changes, then CTRL+X to eXit.
sudo shutdown -r now will restart the computer.
| Attachment | Size |
|---|---|
| 12.72 KB | |
| 16.68 KB | |
| 34.66 KB | |
| 34.92 KB | |
| 55.88 KB |
MySQLdump: beware storage engine
Been replicating MySQL databases from master to slave computers and encountered a frustrating, and potentially major problem:
The storage engine is not preserved by mysqldump command. So if you require transactions, which depend on InnoDB storage engine, but your slave uses default storage engine of MyISAM, you could have problems if restoring slave data to the master.
Of course, one could use InnoDB as the default storage engine (set in my.cnf startup configuration file), but that's a slower storage method. That may not impact performance of slaves, depending on if you query against slaves and write against masters...
This is pissing me off a fair bit and really makes me want to look more into (finally) making the switch to PostgreSQL for once and all.
I'll try to update this with potential consequences and any fixes / scripts I come up with to address the issue, but be forewarned.
Tags:
Screenshots with Gnome+Compiz: capture window borders!
It's rather annoying that with Ubuntu GNU/Linux and Gnome desktop manager using Compiz special effects, a screenshot of only a window excludes the window border. That's now fixed!
There are lengthy back-and-forths where Gnome devs claim their stuff works and Compiz devs claim their stuff works, but put them together and it doesn't work. This has been FOUR years like this.
So some clever guy has created a script using xwininfo, scrot, xdotool, and, imagemagick to grab the border with the window.
I’ve taken the liberty to modify it, rather dramatically:
- a Zenity pop-up to tell user to click INSIDE desired window (in case they miss the cross-hair cursor), with a Continue? Y/N option
- detects error if user clicked title bar (frame not available) and gives pop-up error message
- extracts screenshot file name from windows title and makes screenshot-$Title.png the default output file name
- uses zenity –file-selector –save –confirm-overwrite to allow user to store image where ever they please
So, here without further delay, is the script, attached, below
NOTE Something wrong with permissions, links aren't available to Visitors. See comments for a copy/paste job below (until I fix permissions). Sorry!
And here's a little demo, first, a screenshot by pressing Alt+PrtScr (Print Screen):

Here it is again, using my script, showing off the lovely Crux styled title bar:

| Attachment | Size |
|---|---|
| 3.45 KB | |
| 35.98 KB | |
| 38.21 KB |
VLC podcast list truncation
I've been using VLC 1.1.3 and have a rather large amount of science & current events podcast URLs saved in the playlist's Internet/Podcasts area.
Unfortunately, when restarting VLC, I was getting an error message that some URLs couldn't be loaded.
After manually reorganizing my ~/.config/vlc/.vlcrc "podcast-urls" setting, I found the message saying "Cannot load URL 'http:/'"; this indicated the nature of the problem: a truncation issue.
A quick & temporary fix is to split the "podcast-urls=" list into multiple lines, with the "podcast-urls.=" form on the entries following the first one. (Note the dot before the equals sign.)
For something more permanent, I threw together a quick patch to temporarily resolve the issue (note that newer versions of VLC don't appear to have this issue, but didn't seem to be available in the repository for older Ubuntu versions).
I do hope to write this up better when I have a bit more time, but meanwhile, two patches to VLC 1.1.3 source code are attached below. (Patches are in one single zip file until I allow for uploading *.patch files in Drupal settings.)
One will simply fix the truncation problem, the 2nd one will change the version code name from "The Luggage" to "The Baggage", indicating the version displayed in Help/About is slightly modified.
Apply the patches by extracting the source code tarball (tar xjf vlc-1.1.3[...].tar.bz2), then running "patch --dry-run -p 0 < patch-vlc-podcast-truncation[your choice of patch version here].
If the output of the patch command appears ok, re-run without the "--dry-run" option to actually make the changes. You may need to change the "-p0" to "-p1", depending on your current working directory.
| Attachment | Size |
|---|---|
| 902 bytes |
Tags:
Drupal - <!--break--> tag doesn't work with Filtered HTML
I've noticed flaky results with the "break" tag in Drupal content posts: sometimes the summary is broken at the break tag, sometimes not.
I'd never put a lot of effort into figuring it out.
Until today.
Set up a dev site for a client yesterday and was pleasantly surprised that the break tag split the summary from the body of the content as expected.
Today, reviewing the front page, I noticed content that was not split as expected.
After spending too much time diagnosing, I realized it was the Filtered HTML vs the Full HTML Text format setting.
Searching with that new-found knowledge, I came upon a bug report, which indicates it is a regression bug and has existed for 5 years!
I'm shocked by that, and rather disgusted frankly.
Seems the solutions, such that they are, consist of:
Granting Full HTML to all users
Apply one of the questionable patches to every update of Drupal
Have users copy & paste the desired summary from the body content each and every time they modify the body.
This is pathetic that some solution hasn't yet made it into the main branch.
Blah, I have a love-hate relationship with Drupal and it tends towards hatred lately.
Tags:
Job interviews: narcissism wins it (unfortunately)
This is a discouraging but not surprising bit of news:
http://www.cbc.ca/news/business/narcissists-do-better-on-job-interviews-...
Some choice quotes:
People who are natural self-promoters are going to have an advantage and modest people will be at a disadvantage,” Paulhus said in an interview with CBC's Lang & O'Leary Exchange.
That's obvious, but those of us who question everything we (think we) know (i.e. natural skeptics) are really at a disadvantage in the interview.
When narcissists were interviewed by someone who knew more than they did or who called them on their knowledge, they become even bigger braggarts.
Damn, I like to follow what the best of the best are saying and doing (i.e. RhodiumToad on Freenode's #postgresql channel) or Jamie Zawinski (http://www.jwz.org/about.html), and when I see them "in action" I become overwhelmed by how much I don't know.
Yet by most people's standards, I'm quite a computer expert. I guess it's relative but I compare myself to those better than myself. It's the only way to keep learning.
Plus, I suffer from learning something, feeling a burst of happiness at it, thinking it over, realizing that every answer raises more questions, then feel dumber than before because I now have a bunch of questions that are unanswered.
*sigh* Oh, to be more narcissistic and / or sociopathic. Life would be easier and I'd have a great job (even if, as with many of them, I weren't good at it). I guess that's holding me back - I'd consider it a personal failure if I had a job that I wasn't very good at.
PostGreSQL: installing
It's been quite a while since I last installed Postgres DB, way back on Ubuntu 10.04. Now I'm trying out Manjaro (ArchLinux-based) and I've kinda forgotten some things.
Installation was a breeze:
yaourt -S postgresInitializing a database wasn't too hard. First thing I did, as I was foggy on the specifics, was to try to start it, which failed, of course. However, seeking the status of the process helped a lot (via systemd):
# systemctl status -l postgresql.service

● postgresql.service - PostgreSQL database server

   Loaded: loaded (/usr/lib/systemd/system/postgresql.service; disabled; vendor preset: disabled)

   Active: failed (Result: exit-code) since Mon 2015-04-27 05:02:12 PDT; 7s ago

  Process: 12198 ExecStartPre=/usr/bin/postgresql-check-db-dir ${PGROOT}/data (code=exited, status=1/FAILURE)
Apr 27 05:02:12 w00 postgres[12198]: "/var/lib/postgres/data" is missing or empty. Use a command like

Apr 27 05:02:12 w00 postgres[12198]: su - postgres -c "initdb --locale en_US.UTF-8 -D '/var/lib/postgres/data'"

Apr 27 05:02:12 w00 postgres[12198]: with relevant options, to initialize the database cluster.

Apr 27 05:02:12 w00 systemd[1]: postgresql.service: control process exited, code=exited status=1

Apr 27 05:02:12 w00 systemd[1]: Failed to start PostgreSQL database server.

Apr 27 05:02:12 w00 systemd[1]: Unit postgresql.service entered failed state.

Apr 27 05:02:12 w00 systemd[1]: postgresql.service failed.
Notice the emboldened lines: very helpful. We need to initialize a database cluster first, via: su - postgres -c "initdb --locale en_US.UTF-8 -D '/var/lib/postgres/data'", so let's run that except for the locale setting; we're in Canada so it's en_CA.UTF-8:
# su - postgres -c "initdb --locale en_CA.UTF-8

 -D '/var/lib/postgres/data'"

The files belonging to this database system will be owned by user "postgres".

This user must also own the server process.
The database cluster will be initialized with locale "en_CA.UTF-8".

The default database encoding has accordingly been set to "UTF8".

The default text search configuration will be set to "english".
Data page checksums are disabled.
fixing permissions on existing directory /var/lib/postgres/data ... ok

creating subdirectories ... ok

selecting default max_connections ... 100

selecting default shared_buffers ... 128MB

selecting dynamic shared memory implementation ... posix

creating configuration files ... ok

creating template1 database in /var/lib/postgres/data/base/1 ... ok

initializing pg_authid ... ok

initializing dependencies ... ok

creating system views ... ok

loading system objects' descriptions ... ok

creating collations ... ok

creating conversions ... ok

creating dictionaries ... ok

setting privileges on built-in objects ... ok

creating information schema ... ok

loading PL/pgSQL server-side language ... ok

vacuuming database template1 ... ok

copying template1 to template0 ... ok

copying template1 to postgres ... ok

syncing data to disk ... ok
WARNING: enabling "trust" authentication for local connections

You can change this by editing pg_hba.conf or using the option -A, or

--auth-local and --auth-host, the next time you run initdb.
Success. You can now start the database server using:
    postgres -D /var/lib/postgres/data

or

    pg_ctl -D /var/lib/postgres/data -l logfile start
So far, so good.
However, I was completely stumped at the next step. Serves me right for trying to figure it out when I should've been sleeping. "The next step" being actually connecting to the database.
$ psql

psql: FATAL:  role "ron" does not exist
$ psql -U postgres

psql: FATAL:  no pg_hba.conf entry for host "[local]", user "postgres", database "postgres", SSL off
Sure, I haven't created a role (aka user) "ron" yet, but why can't I connect as "postgres"?
Let's modify /var/lib/postgres/data/pg_hba.conf so we have PostGres Host-Based Access configured:
nano /var/lib/postgres/data/pg_hba.confThis next line might help (but I thought the defaults should've worked -- I must have been tired):
local postgres postgres trust
Note: I changed the above config setting back to default and it worked; I must have been really tired. But it still doesn't explain the "pg_hba.conf missing entry for user posgres" message above! This is the default:
local all all trust
To test it:
$ psql -U postgres
psql (9.4.1)
Type "help" for help.
postgres=# create role ron with superuser login;
CREATE ROLE
postgres=#
And I'm in as myself:
$ psql -d postgres -U ron

psql (9.4.1)

Type "help" for help.
postgres=# create database ron;

CREATE DATABASE

postgres=#
So, I'm back in, need to re-familiarize myself with The Postgres Way. It's feels really good to be using it again - feels so much more robust than other SQL servers.
It's one of the finest software engineering projects I've ever encountered.
And the documentation is outstanding too.
Next up: PostGIS installation and learn that.
...
$ psql
...
# CREATE EXTENSION postgis;
CREATE EXTENSION
# SELECT postgis_full_version();
NOTICE: Function postgis_topology_scripts_installed() not found. Is topology support enabled and topology.sql installed?
-[ RECORD 1 ]--------+----------------------------------------------------------------------------------------------------------------------------------------------------------------------
postgis_full_version | POSTGIS="2.1.5 r13152" GEOS="3.4.2-CAPI-1.8.2 r3921" PROJ="Rel. 4.9.1, 04 March 2015" GDAL="GDAL 1.11.2, released 2015/02/10" LIBXML="2.9.2" LIBJSON="UNKNOWN" RASTER
(1 row)
PostgreSQL on IRC
irc://irc.freenode.net/#postgresql has to be the single most informative source of information via IRC that I've ever seen.
And the main character in there, RhodiumToad, is brilliant. Simply, absolutely brilliant. I'm envious of his knowledge and feel like an idiot whenever I spend time in that channel.
Oh, and this is all happening after 10pm (22:00) Vancouver time on a Friday night (I have a boring life, yay?)...
Here's a snippet - look at the level of SQL he threw out there to support someone's pastebin'd query (see the section preceded and followed by a blank line):
[22:18]  RhodiumToad, so about that query...

[22:19]  davidfetter: the position stuff is dubious

[22:20]  RhodiumToad, well, i had tried with arrays, but it turns out that [1,2] <@ [2,1,3] is true :(

[22:20]  consider what happens when comparing id 1 with id 10

[22:20] *** variable is now known as constant.

[22:20]  oh

[22:22]  the "right" (but possibly not fastest) way would be something like

[22:26] * davidfetter starting to wonder what it would be like
*** THIS PART BELOW ***
[22:26] (select coalesce(min(case when rank_id=p.id2 then rank end),4) < min(case when rank_id=p.id1 then rank end) from unnest(ranking) with ordinality as u(rank_id,rank))
*** THIS PART ABOVE ***
[22:27]  actually,

[22:27]  (select coalesce(min(rank) filter (where rank_id=p.id2),4) < min(rank) filter (where rank_id=p.id1) from unnest(ranking) with ordinality as u(rank_id,rank))

[22:28]  er, > not <

[22:28]  that's the WHERE clause?

[22:28]  that would then return true if candidate id1 beat id2

[22:29]  in place of your position stuff, yes - but putting a subquery in the filter of a cross join is major bad news for performance

[22:29]  so I'd restructure the query a bit instead

[22:30]  how?

[22:30]  how many voters and candidates are we looking at here?

[22:31]  tens of candidates, 1/2 million voters

[22:31]  (ish)

[22:31]  so the cross join is going to be on the order of half a billion or so rows

[22:32]  yes

[22:32]  um, wait. on the order of tens of millions, or did i do that math wrong?

[22:32]  candidates * candidates * voters

[22:32]  oh

[22:32]  sorry

[22:33]  30 candidates = 1000 pairs, times half a million voters

[22:33]  yeah, it's nP2

[22:33]  for candidate pairs
Thunderbird "Show Remote Content" button missing
Was sent an image in an email today, was unable to see the image, just a broken container box, with a broken link icon inside and the URL of the source. The URL was not selectable, as swiping it caused the whole container to drag as an icon.
There was no "Show Remote Content" button as an option to view the image either, strangely.
I went into config editor and ensured that "permissions.default.image" was set to 1, per this page's discussion: http://kb.mozillazine.org/Privacy_basics_(Thunderbird) and I also set "mailnews.message_display.disable_remote_image" to true.
Neither presented the "Show Remote Content" button in Thunderbird v 24.6.0 on CentOS 6.5. It did work on Mom's Ubuntu 10.04 with Thunderbird v 24.5.0 though.
After much searching and even asking on irc://irc.mozilla.org/#thunderbird I found the answer, and it's a massive "Derp!"
On the menu bar, View / Message Body As / Original HTML, not View / Message Body As / Simple HTML.
Fixed it.
BTW, clued in to it by looking at the "view source" of the message and reading the HTML image include and alt text tags.
Also, I'm old-school enough to still believe in "Friends don't send friends HTML email," but I know I'm in a minority these days.
Upgrading Ubuntu 10.04 to Ubuntu 14.04 with Mate desktop
We shall upgrade Ubuntu 10.04 with Gnome 2 desktop to 14.04 (also an LTS or Long Term Support release), but the 14.04 will use the Mate desktop, which looks like the traditional Gnome 2 (since Mate is a fork of Gnome 2) instead of the Unity desktop.
The command "do-release-upgrade" will be the method, with some PPAs (Personal Package Archives) added at the end to bring in the Mate desktop on to the system.
A slight complication is that there are limitations on the free space on the root partition.
Further more, the host is about 5,000 km away and owned by someone without technical experience or much sysadmin ability to fix anything that goes wrong.
All access is via ssh through a VPN which auto-connects back to this host.
We will test this in a VM under KVM.
Read Part 1 to get started.
Upgrading Ubuntu Step 1: 10.04 to Ubuntu 12.04
For this project, the goal is to update a remote Ubuntu 10.04 system running good ol' Gnome 2.x (of course) to Ubuntu 14.04 with Mate desktop (a fork of Gnome 2.x) instead of Unity.
The command "do-release-upgrade" will be the method, with some PPAs added at the end to bring in the Mate desktop on to the system.
A slight complication is that there are limitations on the free space on the root partition.
Further more, the host is about 5,000 km away and owned by someone without technical experience or much sysadmin ability to fix anything that goes wrong.
All access on the eventual target will be via ssh through a VPN which auto-connects back to this host, so we'll do this work via ssh to the VM.
We will test this in a VM under KVM.
Our kernel to start with is:
And our free space situation on relevant drives is thus:
Filesystem Size Used Avail Use% Mounted on
/dev/sda2 13G 7.8G 4.5G 64% /
/home/mom/.Private 7.7G 4.6G 2.7G 63% /home/mom
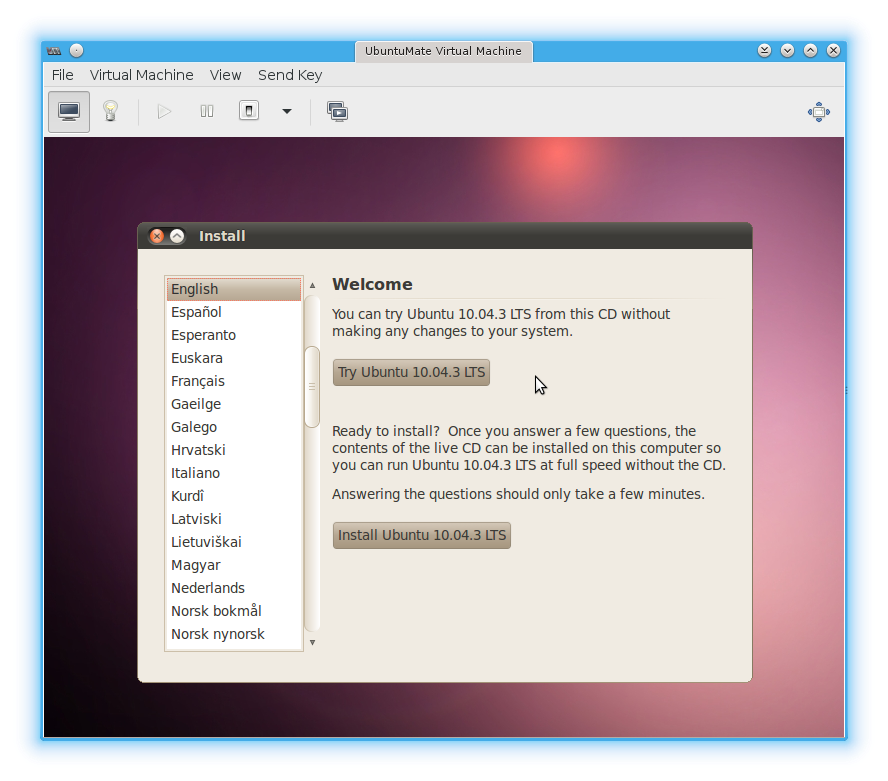
So, let us first create a VM with a fresh Ubuntu 10.04, 32-bit version:
Starting install...
Allocating 'ubuntu-mate.qcow2' | 20 GB 00:00
Creating domain... | 0 B 00:01
No protocol specified
** (virt-viewer:1052): WARNING **: Could not open X display
No protocol specified
Unable to init server: Could not connect: Connection refused
Cannot open display:
Run 'virt-viewer --help' to see a full list of available command line options
Domain installation still in progress. You can reconnect to the console to complete the installation process.
Oh dear, no graphical interface opened. Because running as root? Not seen this before.
However, our new Ubuntu VM is running:
# virsh list --all
 Id    Name                           State
----------------------------------------------------
 2     UbuntuMate                     running
And using virt-manager, we see our Ubuntu VM has booted and is ready to begin installing:

The installation process completed; strictly a default setup with separate / and /home partitions and openssh-server for remote access from the host machine.
We're ready to begin the testing.
First thing, one will notice under the "Avail" column that the VM has more free disk space on / than the real target computer:
Filesystem Size Used Avail Use% Mounted on
/dev/vda1 14G 2.3G 11G 18% /
... by quite a bit. So, I will consume some of it with a Very Large File:
6500+0 records in
6500+0 records out
6815744000 bytes (6.8 GB) copied, 242.576 s, 28.1 MB/s
# df -h
Filesystem Size Used Avail Use% Mounted on
/dev/vda1 14G 8.7G 4.5G 67% /
That should work for our purposes -- testing complexity of process and if target computer has sufficient space.
In a terminal window connected via ssh (for easier copying & pasting, plus the terminal has 4 tabs already being used, so less window switching):
Reading cache
Checking package manager
Continue running under SSH?
This session appears to be running under ssh. It is not recommended to perform a upgrade over ssh currently because in case of failure it is harder to recover.
If you continue, an additional ssh daemon will be started at port '1022'.
Do you want to continue?
Continue [yN] y
Starting additional sshd
To make recovery in case of failure easier, an additional sshd will be started on port '1022'. If anything goes wrong with the running ssh, you can still connect to the additional one.
To continue please press [ENTER]
And... meet you back here in an hour or so - it's a slow process.
While you were gone, this informational prompt came up, I'll show you what it said so there will be no surprises (and to show off to Windows users the type of help one can expect from the system as opposed to "Error 43927489XKQ8B: Things is b0rked, good luck" that they're sadly used to):
Checking package manager
Reading package lists... Done
Building dependency tree
Reading state information... Done
Building data structures... Done
Calculating the changes
Calculating the changes
Do you want to start the upgrade?
32 installed packages are no longer supported by Canonical. You can still get support from the community.
44 packages are going to be removed. 679 new packages are going to be installed. 1123 packages are going to be upgraded.
You have to download a total of 896 M. This download will take about 24 minutes with your connection.
Installing the upgrade can take several hours. Once the download has finished, the process cannot be canceled.
Continue [yN] Details [d]y
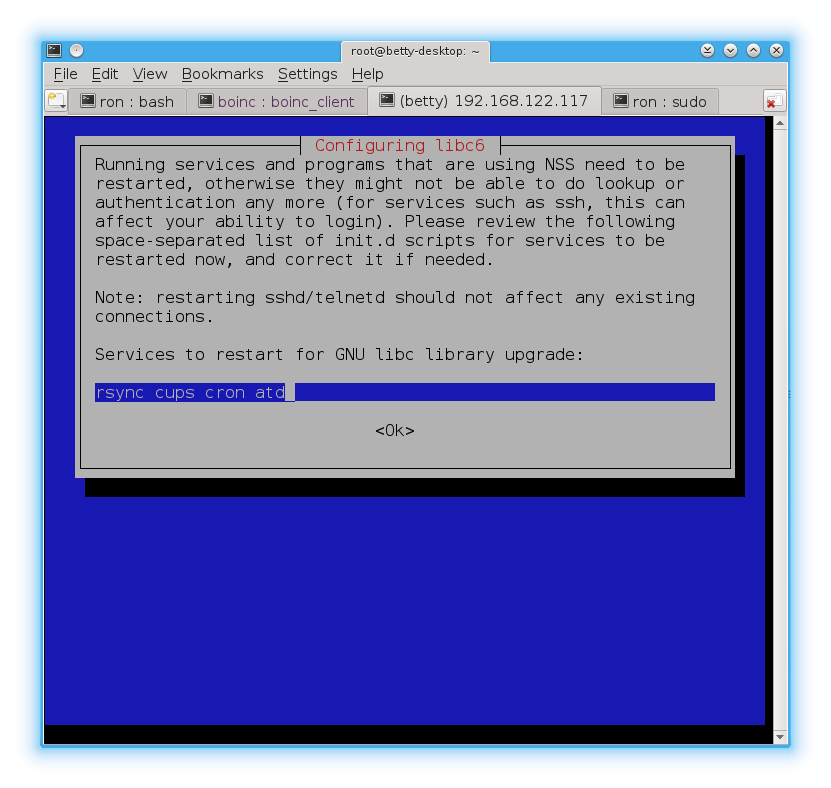
Well, it's "tomorrow" now. I've been waiting for the computer, it's been waiting for me. I got to sleep, it's kept busy 24/7.
But we're getting close. I've taken a couple screen captures of libc6 and grub config screens and now it's asking this:
Searching for obsolete software
Reading package lists... Done
Building dependency tree
Reading state information... Done
Building data structures... Done
Building data structures... Done
Remove obsolete packages?
120 packages are going to be removed.
Removing the packages can take several hours.
Continue [yN] Details [d] y
The process continues...
The process finishes:
Restart required
To finish the upgrade, a restart is required.
If you select 'y' the system will be restarted.
Continue [yN] y
Broadcast message from root@mom-desktop
(/dev/pts/2) at 16:03 ...
The system is going down for reboot NOW!
=== Command detached from window (Wed Apr 29 16:03:04 2015) ===
=== Command terminated normally (Wed Apr 29 16:03:04 2015) ===Connection to 192.168.122.117 closed by remote host.
Connection to 192.168.122.117 closed.
Done:
Linux mom-desktop 3.2.0-80-generic-pae #116-Ubuntu SMP Mon Mar 23 17:29:27 UTC 2015 i686 athlon i386 GNU/Linux
mom@mom-desktop:~$ cat /etc/lsb-release
DISTRIB_ID=Ubuntu
DISTRIB_RELEASE=12.04
DISTRIB_CODENAME=precise
DISTRIB_DESCRIPTION="Ubuntu 12.04.5 LTS"
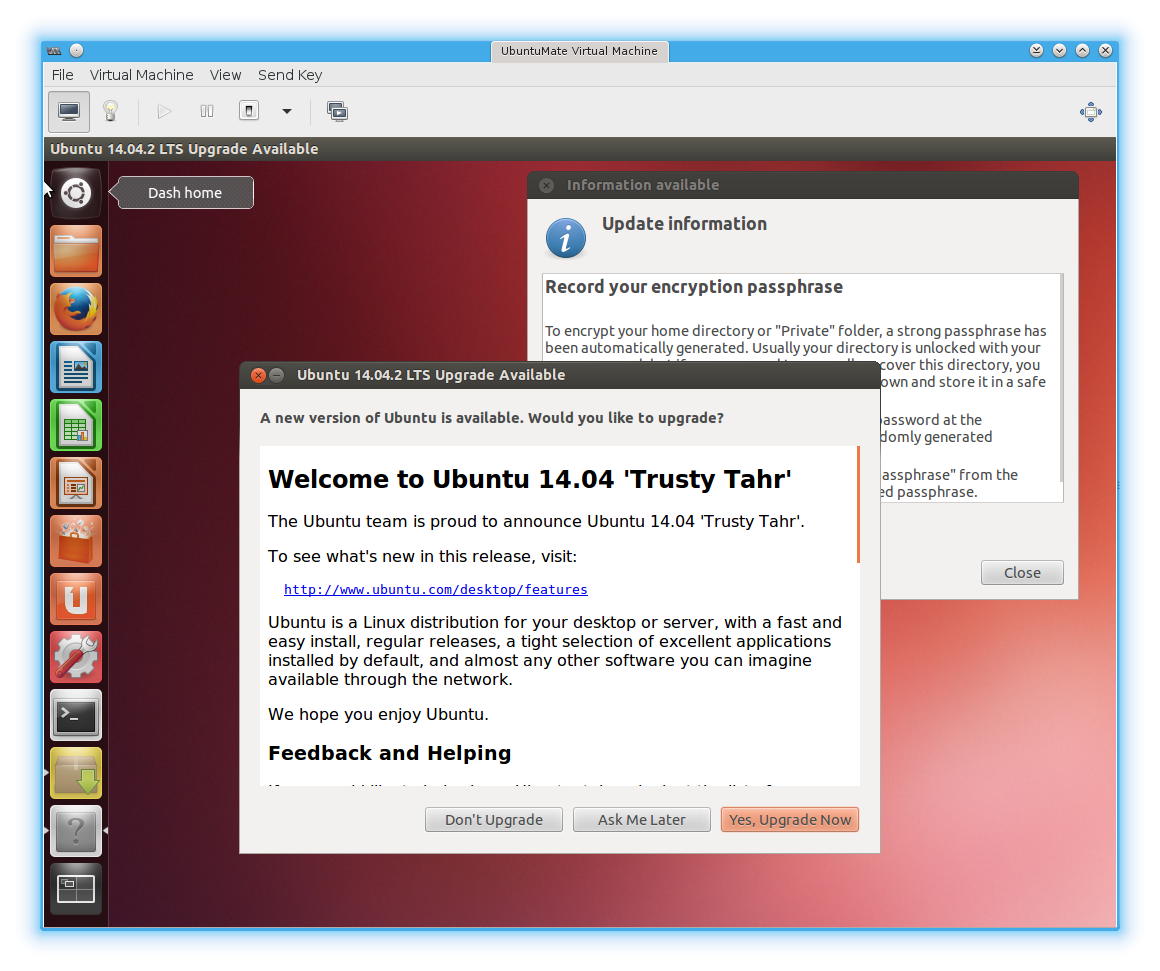
Oddly, in the desktop screenshot below, it appears at first glance that the system is running 14.04 already. This is not correct however - it's prompting us to upgrade to 14.04 Trusty Tahr.

Finally, here's the free space post do-release-upgrade from 10.04 to 12.04 - it appears unchanged!
Filesystem Size Used Avail Use% Mounted on
/dev/vda1 14G 8.7G 4.5G 67% /
This article has gotten longer than I anticipated, so the next do-release-upgrade will be a separate page.
Upgrading Ubuntu 12.04 to Ubuntu 14.04 with Mate desktop: Step 2
In the first part of this guide, we upgraded from Ubuntu 10.04 to Ubuntu 12.04 in a KVM virtual machine (VM).
There were 4.6 GB free space on / (root) partition when we started, and after do-release-upgrade had finished, we had:
Filesystem Size Used Avail Use% Mounted on
/dev/vda1 14G 11G 2.9G 79% /
So, 2.9 GB free. Since running out of space would be less than desirable, we'll free some from apt's cache:
# df -h
Filesystem Size Used Avail Use% Mounted on
dev/vda1 14G 9.7G 3.4G 75% /
Now we have 3.4 GB free space - that should be acceptable. LibreOffice could be uninstalled prior to running another do-release-upgrade if there's a concern about requiring more space still, but I don't think it's necessary - so let's risk proceding as is.
Reading cache
Checking package manager
Continue running under SSH?
This session appears to be running under ssh. It is not recommended to perform a upgrade over ssh currently because in case of failure it is harder to recover.
If you continue, an additional ssh daemon will be started at port '1022'.
Do you want to continue?
Continue [yN] y
Starting additional sshd
To make recovery in case of failure easier, an additional sshd will be started on port '1022'. If anything goes wrong with the running ssh, you can still connect to the additional one.
If you run a firewall, you may need to temporarily open this port. As this is potentially dangerous it's not done automatically. You can open the port with e.g.:
'iptables -I INPUT -p tcp --dport 1022 -j ACCEPT'
To continue please press [ENTER]
Once again, we're doing this through SSH because the eventual "production" target is best accessed that way, because it's more convenient, because that's how remote machines are administered.
If you're doing this at home, you won't need SSH.
Regardless, the process asks another question:
Do you want to start the upgrade?
58 packages are going to be removed. 699 new packages are going to be installed. 1567 packages are going to be upgraded.
You have to download a total of 940 M. This download will take about 24 minutes with your connection.
Installing the upgrade can take several hours. Once the download has finished, the process cannot be canceled.
Continue [yN] Details [d]y
Supper and beverage time while things proceed...
Approximately 3 hours later we're prompted with this:
Reading package lists... Done
Building dependency tree
Reading state information... Done
Building data structures... Done
Building data structures... Done
Remove obsolete packages?
191 packages are going to be removed.
Removing the packages can take several hours.
Continue [yN] Details [d]y
And... a few minutes later, it seems we're up to Ubuntu 14.04:
Restart required
To finish the upgrade, a restart is required.
If you select 'y' the system will be restarted.
Continue [yN] y
Broadcast message from root@mom-desktop
(/dev/pts/1) at 2:16 ...
The system is going down for reboot NOW!
=== Command detached from window (Tue May 5 02:16:45 2015) ===
=== Command terminated normally (Tue May 5 02:16:45 2015) ===
Connection to 192.168.122.117 closed by remote host.
Connection to 192.168.122.117 closed.
After the system reboots:
me@192.168.122.117's password:
Welcome to Ubuntu 14.04.2 LTS (GNU/Linux 3.13.0-51-generic i686)
* Documentation: https://help.ubuntu.com/
Yay, the upgrade was successful. Except now we have Unity as a desktop. And our free disk space is not good, with 1.3 GB free:
Filesystem Size Used Avail Use% Mounted on
/dev/vda1 14G 12G 1.3G 91% /
# apt-get clean
# apt-get autoclean
# apt-get autoremove
Reading package lists... Done
Building dependency tree
Reading state information... Done
The following packages will be REMOVED:
compiz-plugins-main gnome-dictionary gnome-search-tool hyphen-en-us libquvi-scripts libquvi7 libreoffice-emailmerge libreoffice-help-en-gb libreoffice-l10n-en-gb libreoffice-l10n-en-za mythes-en-us printer-driver-hpijs
0 upgraded, 0 newly installed, 12 to remove and 0 not upgraded.
After this operation, 60.4 MB disk space will be freed.
Do you want to continue? [Y/n] y
# df -h
Filesystem Size Used Avail Use% Mounted on
/dev/vda1 14G 11G 2.2G 84% /
Better: 2.2 GB free space is acceptable considering we started with 4.5 GB and haven't cleaned out anything unneeded.
In the next step, we'll finally install Mate desktop.
Upgrading Ubuntu 10.04, Step 3: 14.04 to Mate desktop
Our upgrade process is almost complete - the time-consuming steps of running do-release-upgrade twice was performed in previous steps (Step 1 and Step 2.
For this final step, we install the Mate desktop to replace Unity.
First things first: this test is running in a virtual machine (VM) instead of on real hardware. And advantage is that we can take a snapshot of the state of the VM so that if things go wrong, we can revert.
Domain snapshot UbuntuMate14.04 created
# virsh list --all --with-snapshot
Id Name State
----------------------------------------------------
- UbuntuMate shut off
# virsh snapshot-list UbuntuMate
Name Creation Time State
------------------------------------------------------------
UbuntuMate14.04 2015-05-05 15:18:09 -0700 shutoff
Okay, snapshot / backup made, here's what we're starting with:
* Documentation: https://help.ubuntu.com/
$ uname -a
Linux mom-desktop 3.13.0-51-generic #84-Ubuntu SMP Wed Apr 15 12:11:46 UTC 2015 i686 athlon i686 GNU/Linux
$ cat /etc/lsb-release
DISTRIB_ID=Ubuntu
DISTRIB_RELEASE=14.04
DISTRIB_CODENAME=trusty
DISTRIB_DESCRIPTION="Ubuntu 14.04.2 LTS"
$ df -h
Filesystem Size Used Avail Use% Mounted on
/dev/vda1 14G 11G 2.2G 84% /
Ready to start. The Mate Desktop Wiki is our guide - they probably explain things better than I do. And a giant thank-you to Martin Wimpress for his development work and his guest spots on the following podcasts: Linux Luddites, MintCast, LAS Unplugged.
Let's add the repositories (repos) with the following two commands:
Package repository for Ubuntu MATE.
Packages living here are either required to build the Ubuntu MATE .iso mages or provide the meta packages.
More info: https://launchpad.net/~ubuntu-mate-dev/+archive/ubuntu/ppa
Press [ENTER] to continue or ctrl-c to cancel adding it
gpg: keyring `/tmp/tmpqt8oerjp/secring.gpg' created
gpg: keyring `/tmp/tmpqt8oerjp/pubring.gpg' created
gpg: requesting key 162506E7 from hkp server keyserver.ubuntu.com
gpg: /tmp/tmpqt8oerjp/trustdb.gpg: trustdb created
gpg: key 162506E7: public key "Launchpad PPA for Ubuntu MATE Remix Developers" imported
gpg: Total number processed: 1
gpg: imported: 1 (RSA: 1)
OK
One done, one to go:
These MATE 1.8.1 packages for *only* Ubuntu Trusty, they have been side ported from Debian.
In order to correctly install and configure MATE 1.8.1 on Ubuntu Trusty you will also need to add the following PPA:
* ppa:ubuntu-mate-dev/ppa
We've already done that command recommended in the last line above!
sudo apt-add-repository ppa:ubuntu-mate-dev/ppa
sudo apt-add-repository ppa:ubuntu-mate-dev/trusty-mate
Again, we've already run the first command, and we're running that second command right now. (Odd that the output of a command is to... run that command. Huh.)
To continue with the output of the last command:
sudo apt-get upgrade
sudo apt-get install --no-install-recommends ubuntu-mate-core ubuntu-mate-desktop
More info: https://launchpad.net/~ubuntu-mate-dev/+archive/ubuntu/trusty-mate
Press [ENTER] to continue or ctrl-c to cancel adding it
gpg: keyring `/tmp/tmpdh4otxcu/secring.gpg' created
gpg: keyring `/tmp/tmpdh4otxcu/pubring.gpg' created
gpg: requesting key 162506E7 from hkp server keyserver.ubuntu.com
gpg: /tmp/tmpdh4otxcu/trustdb.gpg: trustdb created
gpg: key 162506E7: public key "Launchpad PPA for Ubuntu MATE Remix Developers" imported
gpg: Total number processed: 1
gpg: imported: 1 (RSA: 1)
OK
As per the advice above, an update of the repo cache and an upgrade of the software is recommended next; we'll do that momentarily with sudo apt-get update ; sudo apt-get upgrade.
Finally, do we want a vanilla Mate desktop, or an Ubuntu-branded one?
From the Mate Wiki again:
Ubuntu MATE is a more comprehensive option that offers a slightly tweaked layout, configuration, and themes to integrate into Ubuntu in a more seamless fashion. This will install the complete MATE Desktop Environment as well as LightDM and numerous other applications to provide a full and well rounded desktop.
The output from the last command above gives instruction to install the Ubuntu version via sudo apt-get install --no-install-recommends ubuntu-mate-core ubuntu-mate-desktop.
I think it best to choose the Ubuntu Mate version as recommended.
Once it's been screen-shot-captured, perhaps I'll roll-back the VM snapshot and install the Vanilla Version to screen shot it too, for comparison.
So, per last output pasted above, as always, running as root (saves us tying "sudo" a bunch of times, and providing passwords frequently) :
# apt-get upgrade
Reading package lists... Done
Building dependency tree
Reading state information... Done
Calculating upgrade... Done
The following packages have been kept back:
deja-dup linux-generic linux-generic-pae linux-headers-generic
linux-headers-generic-pae linux-image-generic linux-image-generic-pae
The following packages will be upgraded:
compiz compiz-core compiz-gnome compiz-plugins compiz-plugins-default
compizconfig-backend-gconf deja-dup-backend-gvfs gtk2-engines-pixbuf
libcompizconfig0 libdecoration0 libgail-common libgail18 libgtk2.0-0
libgtk2.0-bin libgtk2.0-common libvte-common libvte9 linux-libc-dev ppp
python-vte
20 upgraded, 0 newly installed, 0 to remove and 7 not upgraded.
Need to get 14.5 MB of archives.
After this operation, 24.4 MB of additional disk space will be used.
Do you want to continue? [Y/n] y
(gconftool-2:4963): GConf-WARNING **: Client failed to connect to the D-BUS daemon:
Unable to autolaunch a dbus-daemon without a $DISPLAY for X11
Uh-oh, looks like running via SSH caused a minor problem, but I doubt it's a game-stopper.
Need to get 114 MB of archives.
After this operation, 401 MB of additional disk space will be used.
Do you want to continue? [Y/n] y
That took a rather long time, but at the end:
Filesystem Size Used Avail Use% Mounted on
/dev/vda1 14G 12G 1.6G 88% /
We can clean some stuff up:
root@mom-desktop:~# apt-get autoclean
Reading package lists... Done
Building dependency tree
Reading state information... Done
root@mom-desktop:~# apt-get autoremove
Reading package lists... Done
Building dependency tree
Reading state information... Done
0 upgraded, 0 newly installed, 0 to remove and 7 not upgraded.
root@mom-desktop:~# df -h
Filesystem Size Used Avail Use% Mounted on
/dev/vda1 14G 12G 1.8G 87% /
Really, we want to clean out Unity to save a bunch of space.
[sudo] password for mom:
Reading package lists... Done
Building dependency tree
Reading state information... Done
The following packages were automatically installed and are no longer required:
gstreamer1.0-plugins-base-apps liboxideqt-qmlplugin liboxideqtcore0 liboxideqtquick0 libqt5webkit5-qmlwebkitplugin libreoffice-presentation-minimizer libufe-xidgetter0 libunity-webapps0 oxideqt-codecs qtdeclarative5-accounts-plugin qtdeclarative5-dialogs-plugin qtdeclarative5-privatewidgets-plugin qtdeclarative5-ubuntu-ui-extras-browser-plugin qtdeclarative5-ubuntu-ui-extras-browser-plugin-assets ubuntu-settings unity-webapps-common unity-webapps-qml unity-webapps-service webaccounts-extension-common webapp-container webbrowser-app xul-ext-unity xul-ext-webaccounts xul-ext-websites-integration
Use 'apt-get autoremove' to remove them.
The following packages will be REMOVED:
ubuntu-desktop unity unity-2d
0 upgraded, 0 newly installed, 3 to remove and 7 not upgraded.
After this operation, 6,667 kB disk space will be freed.
Do you want to continue? [Y/n]
After a restart:
Filesystem Size Used Avail Use% Mounted on
/dev/vda1 14G 12G 1.8G 87% /
But there's more Unity cruft sitting around, so try to get rid of all of it:
0 upgraded, 0 newly installed, 96 to remove and 6 not upgraded.
After this operation, 50.6 MB disk space will be freed.
Do you want to continue? [Y/n]
I cut the packaage list out from above (all 96 of them).
Rebooting brought up a warning about corrupted graphics:

I chose to run in reduced graphics mode and got the nice Mate login screen:

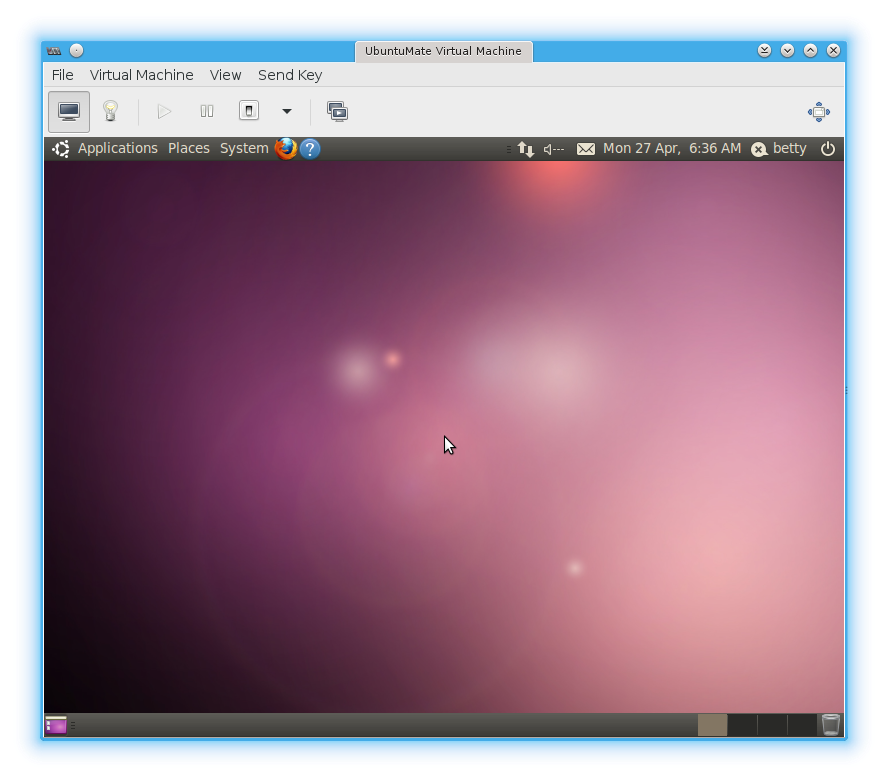
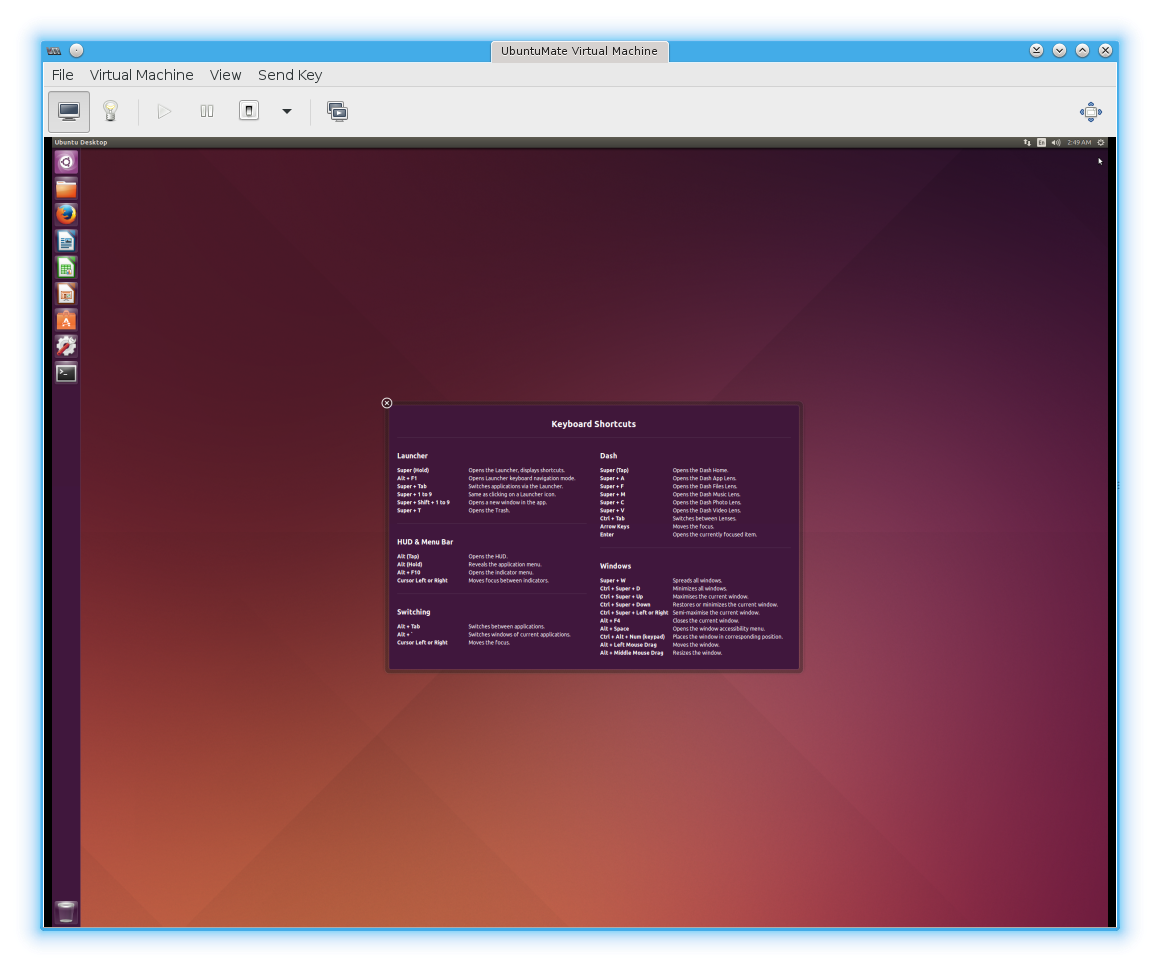
Below is our new, lovely Mate desktop on Ubuntu 14.04

WindMobile - roaming within a Wind Home zone
I take daily walks in a park inside Vancouver where the Wind coverage is mediocre. I accept that coverage isn't going to be great with them; it's okay for the great deal I get with them (unlimited talk across North America, unlimited global SMS, unlimited MMS, call control (voice mail, call display, conference calls, etc.), unlimited internet (throttled after 5 GB per month), and tethering -- all for $40 CDN per month.
Having dealt with Rogers, Telus, and Bell, it's been a pleasure to deal with Wind.
However, this issue has really been bugging me, and it's not so much due to the weak coverage in a large park on a south (away from the city) facing slope, it's due to the customer support.
What I wanted to do, having had to call in twice to explain the issue, was talk to the tech guys about updating my Preferred Roaming List. I believe Vancouver is "location" 50 - part of the cell tower ID. When in a Wind Home zone (like location 50), one cannot force one's phone to connect to a Wind Away (Rogers) tower.
This policy is completely understandable. For users that auto-select their network provider so that when outside of a Wind Home zone they can still connect to Wind Away (roaming on Rogers), well they would certainly not want to answer a call, talk, then when the bill comes in find out that they were auto-connected to a Wind Away tower in a Wind Home zone (say, due to stronger signal from Wind Away tower near by).
I believe this policy is set via a "Preferred Roaming List" that says, basically, "when in a Wind Away zone, you can connect to Rogers; when in USA, you can connect to T-Mobile, etc." These policies are updated from the network provider to their customers' phones via SMS messages that are captured by the SIM card and never appear in the users' Messages. There are 4 layers / levels of SMS and only one of those is for the users to communicate.
I had hoped to speak to someone to see if I could have my Preferred Roaming List updated. I was doubtful they'd do it for me, but I wanted to ask. It would provide confirmation (or not) that my theory of how Preferred Roaming Lists work.
However, I got "roaming outside Wind Home should work - try it and call us back if not" - despite having tried it during the phone call to tech support (made from a different phone).
Then I got, "Well, there's network issue right now." "Please escalate - this has been ongoing and I tried to address it last week."
Tech support did call back - at 09:00 on a Sunday morning, which I missed. Then I got an SMS saying ticket was closed.
Called them again, got "your SIM is defective - free replacement at service centre." "My SIM (recently replaced), the SIM in a Nexus 5 also only a few months old), and the SIM in a Samsung Galaxy Nexus - all bad?!?"
"Oh, it's because Wind Away towers use a different frequency - only some phones support that." Total bullshit answer, obviously Rogers doesn't have separate frequencies between Wind Home and Wind Away zones ... for Wind's benefit.
So right now I'm quite pissed off at Wind. Not for the coverage hole (which I was told would be fixed with a new tower years ago, then that the new tower would be next year...), nor with them being unable to update my Preferred Roaming List, but with the uninformed, illogical, and frankly bullshit answers I kept getting.
It's been over 3 years and I'd hoped that the holes would've been fixed - but I really hoped they'd remain as responsive as when a network engineer sent out a rigger to adjust my local tower when we began having serious issues a few months into our having switched to them.